The Ultimate Guide to Breaking in a Baseball Glove: Tips, Techniques, and Conditioning
August 2, 2024
Taking the field with a stiff, unyielding baseball glove can be totally frustrating. When every catch feels forced and uncertain, it’s easy to see why so many young players search for ways to break in their gloves effectively and quickly. The difference between a brand-new stiff glove and one that fits like an extension of your hand can make or break moments in critical gameplay. Understanding this need, we’ve dug deep into various trusted techniques adopted by seasoned players to provide you with precise steps you need for optimal performance.
Through meticulous research and hands-on experience, we've compiled actionable methods endorsed by professionals and trusted sports brands. Picture massaging glove oil into supple leather, feeling it transform from rigid to responsive under your palms—these are experiences that make all the difference. But beware, there's one common mistake nearly everyone overlooks which could spell disaster for your glove's future use. Let's begin by discussing how to choose and apply the right conditioning products effectively...
The most effective way to break in a new baseball glove is by using a combination of techniques such as using a
glove conditioner, playing catch to loosen the leather, and strategically shaping the pocket with a mallet. Additionally, focusing on the specific needs based on your position, whether it's pitching or infield, can help tailor the break-in process to suit your playing style. Remember to consult with experienced players or coaches for additional tips and tricks.
Applying Oil and Conditioner
Once you have selected a high-quality glove oil or conditioner specifically made for leather baseball gloves, it's time to focus on the application process. The right product can significantly enhance the leather's flexibility, durability, and overall performance, making it crucial to choose a product that meets these requirements.
When selecting a conditioning product, consider one that not only softens the leather but also provides protection against moisture, helping to maintain the glove's shape and integrity over time. Popular choices include Rhino Wax Glove Oil, Sarna Glove Conditioner, and Rawlings Glovolium. These products often contain natural oils and emollients designed to clean, condition, and protect the leather from drying out and becoming brittle.
The application process is equally critical in ensuring the best results. Begin by applying a small amount of oil or conditioner to a soft, clean cloth. This will give you better control over how much product is applied and prevent over-saturation of the glove. Gently rub a thin layer into the leather, focusing on the palm, fingers, and webbing—the areas that undergo the most stress during play. It's important to avoid over-saturating the glove, as this can lead to heaviness or stiffness that could hinder your performance on the field.
After applying the oil or conditioner, you must allow adequate time for absorption. Let the glove sit for 24 hours in a cool, dry place. This allows sufficient time for the oil or conditioner to fully penetrate and soften the leather while also aiding in maintaining its shape. Once this period has elapsed, wipe off any excess product that hasn't absorbed into the glove using a clean cloth.
Think of conditioning your baseball glove like applying lotion to your skin—just as your skin needs hydration to remain supple and healthy, leather gloves require proper conditioning to maintain their flexibility and longevity.
By carefully choosing a high-quality product and following a meticulous application process, you're taking important steps towards maximizing your glove's performance potential. These efforts go a long way in prolonging the life of your glove while ensuring optimal playability.
Understanding how various techniques can soften leather is key to perfecting your baseball glove. Delving into these methods will not only elevate your glove game but also make you more adept at optimizing your gear for prime performance.
Softening Techniques for Leather
Breaking in a baseball glove involves a variety of techniques to shape the leather and make it game-ready. While applying oil and conditioner helps maintain the suppleness of the leather, specific softening techniques can accelerate the process, ensuring that the glove conforms perfectly to your hand.
Using Warm Water
Dampening a cloth with warm water (not hot) and gently rubbing it over the glove's surface is the first step to softening the leather. The warmth helps to relax the leather fibers, making them more pliable and thus easier to mold. It is essential to ensure that the water is warm and not hot, as hot water can damage the leather by drying it out or causing it to shrink.
Applying Heat
The application of heat is a critical step in softening the leather of a baseball glove. Placing the glove in an oven set to a low temperature (no more than 150°F) for 5-10 minutes can help relax and soften the leather. However, it is crucial to monitor closely during this process to avoid overheating and damaging the leather. An alternative method is using a hair dryer on a low setting to warm specific areas, such as the finger sections or webbing, providing targeted softening where needed.
It's important to exercise caution when using heat to soften the leather, as excessive heat can lead to irreversible damage. Proper monitoring and periodic checking are vital during this process to prevent detrimental effects on your baseball glove, ensuring successful softening without compromising its integrity.
Massaging the Leather
Once the leather has been warmed, massaging and kneading it with your hands becomes crucial. This manual manipulation of the leather helps work out stiffness and ensures that the whole glove conforms comfortably to your hand. Paying special attention to areas that require more flexibility, such as the webbing and finger sections, allows for targeted softening based on your playing position and personal preferences.
Imagine kneading bread dough, but with much more care. Just as bread dough benefits from proper shaping and working out air bubbles for perfect consistency, massaging and kneading the leather helps ensure that your baseball glove achieves optimal flexibility where you need it most.
By employing these softening techniques in tandem with applying oil and conditioner, you can effectively hasten the break-in process of your baseball glove, ensuring that it's game-ready in no time at all.
Shaping the Glove Pocket
After using softening techniques to make the leather more pliable, it's time to start working on the pocket of the glove. Shaping the pocket is crucial because it directly impacts how well your glove will catch and hold onto the ball. Let's explore the step-by-step process to achieve the perfect shape for your glove's pocket.
Step I: Positioning the Baseball
The first step involves positioning a baseball in the glove's pocket where you want it to form. Make sure to choose a baseball that matches the size you typically use for gameplay. By placing the ball in the desired position within the pocket, you're essentially training the leather to mold around the ball's shape.
Closing the glove around the ball is important here. You want to ensure a snug fit between the ball and the glove's leather. This not only helps in shaping the pocket but also allows for a more secure grip when catching or fielding. It's like customizing a mold around your hand and the ball, creating a comfortable and effective fit.
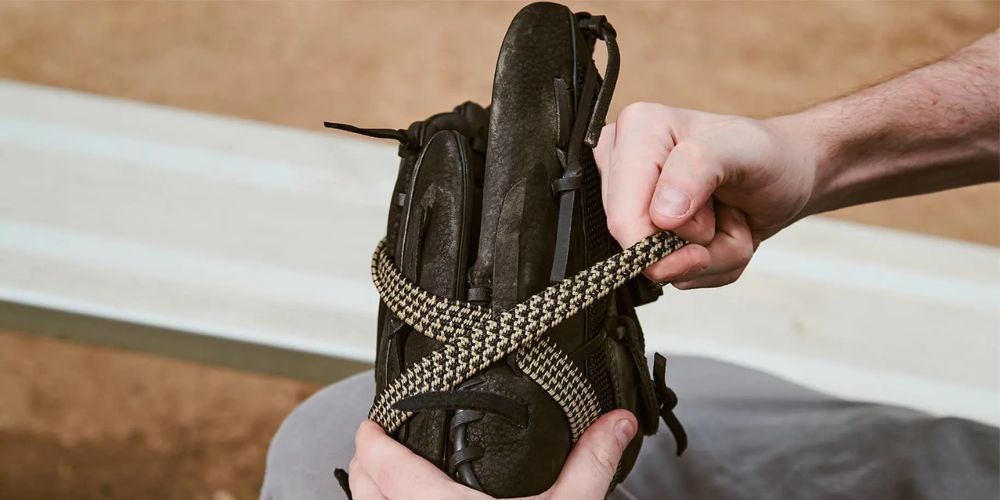
Step II: Tying It Up
Once the baseball is securely positioned in the pocket, wrap the glove tightly with a belt or thick string to maintain the closed position around the ball. This binding helps retain the desired shape of the pocket while allowing it to set properly.
Leaving it tied for about 24 hours gives adequate time for the leather to conform to the shape of the ball, creating a natural concave form that is ideal for trapping and securing incoming balls. The uniform pressure applied during this period plays a significant role in achieving consistent depth and structure throughout the pocket, essential for a reliable performance on the field.
Step III: Consistent Repetition
The process of forming and shaping doesn't end with just one session; repetition is key. By repeating this process every few days, you encourage your glove to conform consistently to your hand and to maintain a deep, well-defined pocket. Consistency is crucial as it allows for subtle adjustments and ensures that your glove suits your playing style perfectly.
Shaping your glove's pocket is an essential part of breaking in your baseball glove. By following these steps and giving attention to detail, you are personalizing your glove to your game-style, creating a reliable and comfortable tool for making those awe-inspiring catches out in the field.
Sculpting a customized fit for your baseball glove enhances its performance on the field. Now, let's dive into fine-tuning another crucial aspect—the adjustment and loosening of laces.
Adjusting and Loosening Laces
After shaping the pocket, the next critical step in breaking in a new baseball glove involves adjusting and loosening the laces. Even after all the mallet pounding and oily treatments, if your glove doesn't fit your hand correctly, it won't do you much good.
Step I - Identifying Tight Areas Take a close look at your glove and find out where exactly the tightness is coming from. It could be near the fingers, around the webbing, or even close to the wrist area. Identifying these tight spots will help you target them specifically when loosening the laces. For example, if you feel resistance when closing the glove, especially around your fingers, that's where you'll want to focus.
Step II - Loosening Laces Once you've found those overly tight sections, it's time to start loosening those laces. Remember, this isn't a one-size-fits-all job—the goal is to get that perfect snugness tailored to your hand without compromising the overall structure of the glove. Over-loosening can lead to a floppy or ill-fitted glove, so it's essential to loosen them gently, paying close attention to maintain the shape and integrity of the glove. If there are specific areas where the leather feels stiff and inflexible, concentrate on loosening those parts up. Be patient—the goal is a comfortable and flexible fit, not just any fit.
Remember: The way you adjust your laces should always revolve around fine-tuning the fit of your glove, ensuring it molds perfectly to your hand every time you wear it.
Step III - Re-Tightening for Fit As you keep using your glove—whether by playing catch or using a mallet—you may find that certain areas need re-adjustment. This step involves responding to pressure points and areas that might not conform to your hand as they should. After identifying these trouble spots, re-tighten the laces strategically, making sure they provide a snug yet flexible fit tailored specifically to your hand’s comfort. This process ensures that as your glove continues to break in with more use, it does so in tune with your hand's unique contours.
By following these steps and paying close attention to how well your glove fits your hand after each adjustment, you'll be well on your way to achieving a game-ready glove that feels like an extension of your hand.
Utilizing a Glove Mallet or Ball
When breaking in a new baseball glove, the choice of tool significantly impacts the process. The two most common options are glove mallets, specifically designed for glove break-in, and regular baseballs, offering a budget-friendly alternative.
A glove mallet is typically made of wood or another sturdy material and is shaped to fit within the palm and fingers of the glove, providing targeted force to specific areas for effective shaping and conditioning. Conversely, using a baseball requires consistent striking against the glove's pocket, heel, and fingers to achieve softness and flexibility.
Step I - Choosing Your Tool
Choosing between these two options largely depends on personal preference and budget constraints. While a glove mallet offers precise and targeted force application, it comes with an additional cost. On the other hand, using a baseball can be just as effective with consistent effort. Consider factors such as comfort, efficiency, and durability when making your choice.
Before you begin, ensure that you have a suitable workspace. A flat, stable surface provides necessary support for the glove during the process, preventing unnecessary strain or damage to its structure.
Step II - Striking the Glove
Place the glove on your selected workspace and begin by steadily striking the inside of the glove with either the mallet or the baseball. The objective is to focus on loosening stiff areas, particularly targeting the pocket and fingers where flexibility is crucial. Consistency is key here; each strike contributes to gradually softening and shaping the leather.
Consistency is key here; each strike contributes to gradually softening and shaping the leather. Remember not to rush this process—patience and frequent repetition ensure thorough coverage of all parts of the glove that need breaking in.
Step III - Creating Break Points
To optimize your glove's performance on the field, it's essential to create strategic break points during the breaking-in process. Focusing strikes on specific areas like the heel and hinge points will naturally form folding lines that facilitate easier opening and closing of the glove.
The goal here is to establish natural flex points that align with how your hand moves during play. These break points significantly impact how well your glove functions during catching and throwing movements, so be sure to dedicate ample time to this stage to achieve optimal results.
Now that we've covered utilizing a glove mallet or ball for breaking in your baseball glove, let's dive into comparing various techniques for conditioning your new glove.
Testing and Playing Catch
Once you've gone through the initial steps of breaking in your baseball glove, it's time to put it to the test. The first thing you want to do is close and open the glove repeatedly to feel its readiness and flexibility. Make sure it feels comfortable and molds easily to your hand. If it still feels stiff, don't worry - there are additional softening techniques we can apply.
The most crucial step now is to play catch with a partner using your newly treated glove. Regular use helps the glove mold to the shape of your hand and reinforces the pocket. You'll want to play catch for a good amount of time until the glove feels comfortable and game-ready.
When you're catching the ball, pay attention to how the glove is performing. Is it snatching the ball cleanly, or does it pop out when you catch? Evaluate the improvements in comfort and functionality after each session. Compare these with your previous experiences until you're satisfied that the glove feels like it always belonged in your hand.
Take a moment after each session to inspect how well the glove is working for you. Look for any signs of improvement in terms of comfort, flexibility, and catching ability.
Think of this process as similar to breaking in a new pair of shoes: at first, they might feel stiff, but with use, they start to fit perfectly and become comfortable.
It's essential not only for comfort but also for functionality and performance on the field. After all, a well-broken-in glove can make all the difference in securing those tough catches during a game.
Use our in-depth guides and recommendations to ensure an optimal break-in process for your specific glove model. Remember, practice makes perfect, so keep testing and playing catch until your glove feels like an extension of your hand—ready for any play that comes your way!
Mastering the art of breaking in a baseball glove requires patience, persistence, and dedication. But with a well-conditioned glove by your side, you'll be more than ready to conquer the game. Keep practicing and refining your techniques to elevate your game on the field.
How long does it take to break in a baseball glove?
Breaking in a baseball glove typically takes a few weeks to a few months, depending on the methods used and how often you practice with the glove. To speed up the process, it’s important to use the glove regularly during practice and games. Additionally, applying a glove conditioner can soften the leather, making it more pliable and quicker to mold to your hand. Some players prefer to use specific techniques such as steaming the glove or using a glove mallet to shape it. However, be cautious with any method that could damage the glove’s leather or structure. Regular use remains the most reliable way to ensure your glove fits perfectly to your hand.
What are the best techniques for breaking in a baseball glove?
There are several effective techniques for breaking in a baseball glove. Here are a few popular methods:
Play Catch Regularly: The most straightforward way to break in a glove is simply by using it. Playing catch regularly helps the glove mold to the shape of your hand.
Use a Glove Mallet: A glove mallet is specifically designed to help shape a glove. Use the mallet to pound the pocket and other areas of the glove to soften the leather.
Conditioning the Leather: Applying a small amount of glove conditioner or oil helps soften and protect the leather. Be careful not to over-apply, as too much oil can make the glove heavy and cause deterioration over time.
Wrap the Glove: After applying conditioner and forming the pocket, wrap the glove with a ball inside it using rubber bands or string. This helps maintain the shape and deepen the pocket.
Steaming the Glove: Some players opt to steam their gloves, which can soften the leather and speed up the break-in process. This method should be done carefully to avoid damaging the glove.
Each technique has its advantages, so it’s often best to combine several methods for the best results.
Is glove conditioner necessary, and how should I use it?
Glove conditioner is not strictly necessary, but it can be very beneficial for breaking in a glove and maintaining its leather over time. Conditioner helps soften the leather, making it more pliable and easier to shape. It also provides moisture to prevent the leather from cracking and becoming brittle. Here’s how to use glove conditioner effectively:
1. Clean the Glove: Before applying any conditioner, ensure the glove is clean and free of dirt or dust.
2. Apply Sparingly: Use a small amount of conditioner—about the size of a dime. Rub it evenly into the leather using a clean cloth or your fingers.
3. Focus on Key Areas: Pay particular attention to the pocket, laces, and hinge points, as these areas are crucial for the glove’s flexibility and performance.
4. Let It Absorb: Allow the conditioner to absorb into the leather for a few hours or overnight before using the glove.
5. Remove Excess: Wipe off any excess conditioner with a clean cloth to prevent the glove from becoming too heavy.
Using conditioner sparingly and regularly can extend the life of your glove and ensure it performs well throughout the season.
Check out the latest guides on baseball gear