
How to Properly Clean and Maintain Your Motorcycle Chain for Optimal Performance
October 10, 2024
Maintaining your motorcycle chain might seem straightforward, but its proper care is vital for ensuring optimal performance and longevity. Without regular cleaning, dirt and grime can reduce efficiency, leading to more frequent adjustments or replacements—something no rider wants on their weekend throttle session or while racing on track day.
But you don’t have to worry because preparing for this task doesn't have to be daunting. With years of riding experience paired with substantial research, this guide provides clear steps on how to effectively clean and maintain your chain. We’ll start by gathering essential tools and materials, ensuring you're well-prepped for an efficient cleanup process.
To properly clean and maintain your motorcycle chain, first, clean the chain and rear sprocket using a stiff nylon brush and a suitable cleaning spray every 1,000 to 1,500 km. After cleaning, lubricate the chain every 300 km and ensure proper tension by checking it during each cleaning session, targeting slack of 25mm - 40mm for road bikes, followed by adjustments if necessary.
Gathering Tools and Materials
The success of cleaning and maintaining your motorcycle chain hinges significantly on having the correct tools at your disposal. Think of it as preparing for a road trip—just as you wouldn't set out without checking that your gas tank is full, you shouldn’t start this meticulous task without assembling the essentials.
Essential Items
First off, Chain Cleaning Spray is non-negotiable. This specially formulated product breaks down the tough grime that accumulates on your chain over time. Using ordinary cleaners can damage the chain or leave behind residue that attracts even more dirt.
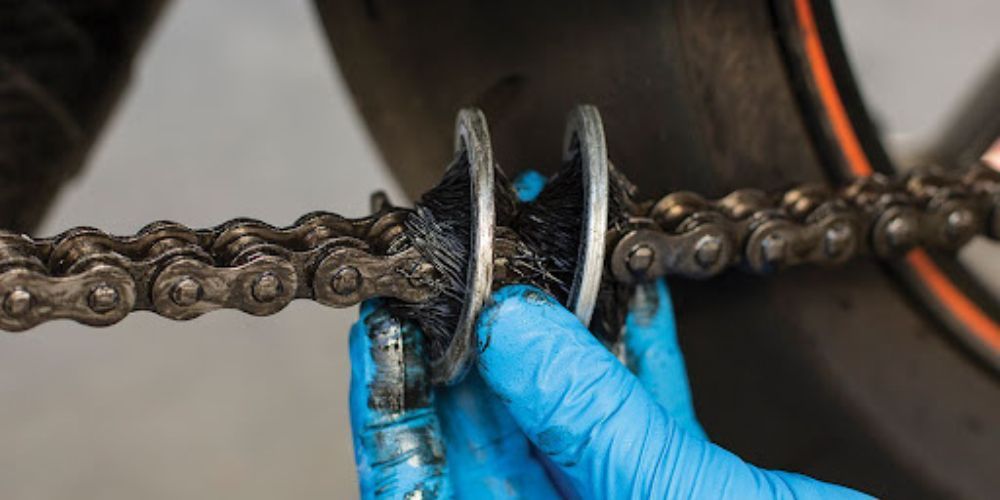
Next on the list is a Stiff Nylon Brush. A three-sided chain cleaning brush works best since it reaches into the links and scrubs off stubborn deposits without causing harm to the metal components. It's like having the right tool for a car repair; using an inadequate brush could lead to unnecessary scratches or accelerate wear.
You’ll also need a Microfiber Cloth. These cloths are gentle enough to wipe away excess dirt without scratching sensitive surfaces. After spraying and brushing, you’ll want to ensure everything is tidy, and a microfiber cloth does just that.
Don’t forget about Chain Lubricant, such as Motul C2 Chain Lube, which keeps your chain functioning smoothly after cleaning. Proper lubrication reduces friction, enhances performance, and prolongs its lifespan, much like oiling a squeaky hinge.
As you gather these items, consider wearing Latex Gloves. Not only do they protect your hands from potentially harsh chemicals in cleaners, but they also keep your fingers clean during messy work! Trust me; you don't want to end up with gunky hands right before heading out for a ride.
Finally, including a Paddock Stand in your preparations makes a considerable difference. This stand lifts the rear wheel off the ground, providing easy access to the chain while enabling better visibility for thorough cleaning.
Ensuring you have all these materials gathered beforehand can save a lot of time and guarantee a more thorough cleaning process. Just imagine starting your cleaning session only to realize you're missing that all-important brush or lubricant—you wouldn't want that. Being prepared not only contributes to efficiency but also makes the entire endeavor more enjoyable, allowing the focus to remain squarely on getting that motorcycle in top shape for your next adventure.
With everything primed and ready, let's now shift our focus to ensuring safe practices as we engage in this crucial maintenance activity.
Safety Precautions
Cleaning a motorcycle chain may seem like a simple task, but it comes with its own set of risks and hazards. Whether you’re dealing with chemicals or moving parts, understanding and executing proper safety precautions is paramount. First and foremost, wearing protective gear is crucial. Always reach for a good pair of gloves when you're handling cleaning agents. This not only keeps your hands safe from harsh chemicals but also protects you from sharp edges or components that could cause cuts.
Use of Protective Gear
In addition to gloves, consider wearing safety goggles to shield your eyes. You might think it’s overkill, but a sudden splash from a cleaning solution or debris flying around can lead to serious injury if you’re unprotected. Trust me; those tiny particles can sting and create more trouble than you'd expect. Lastly, wearing long sleeves can provide an extra layer of protection against scrapes and splatters, so don't skip this detail.
Work in a Well-Ventilated Area
Equally important is the environment in which you choose to work. Cleaning sprays, lubricants, and solvents often emit fumes that can be detrimental if inhaled over prolonged periods. That's why it’s imperative to clean in an open space or a well-ventilated garage. Fresh air helps dilute harmful vapors and prevents respiratory issues that can stem from continuous exposure to strong chemicals.
Think of it this way: maintaining a safe workspace isn’t just about protecting yourself during the task at hand; it's also about creating a healthy environment that allows you to work efficiently without distractions or fears about your well-being.
By taking these safety precautions seriously, you lay the groundwork for a smooth and hazard-free chain maintenance experience. Once you've donned all necessary safety gear and chosen the right spot for your work, you'll be prepared to engage in the next phase where techniques will come into play.
With safety firmly in mind, let’s now focus on the effective methods for cleaning your motorcycle chain to ensure optimal performance.
Cleaning Process
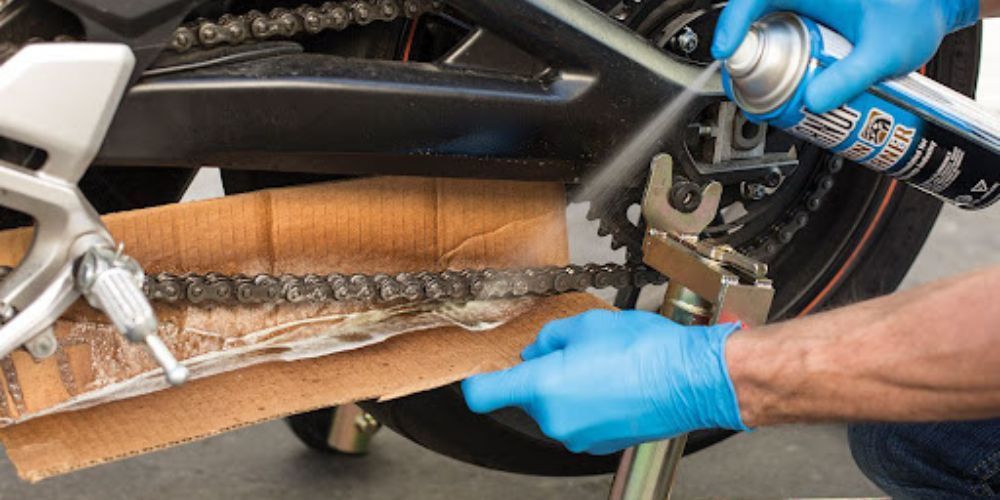
A clean motorcycle chain doesn’t just enhance your ride; it plays a crucial role in prolonging the lifespan of both the chain and the sprockets. Therefore, performing routine maintenance becomes essential. Start by setting up your motorcycle on a padded stand to elevate the rear wheel off the ground. This makes rotating the chain easy, providing you access to all angles without straining your back or arms. Elevating your motorcycle also offers stability, letting you work comfortably and efficiently.
Next, move onto applying chain cleaner. A popular choice is kerosene due to its effective grime-cutting properties that won't harm your O-rings—an important feature of many modern chains. Spraying an even coat along the length of the chain is crucial; aim for complete coverage without saturating nearby components unnecessarily. Give the cleaner a few minutes to permeate and loosen any caked-on dirt, making scrubbing much simpler.
With the cleaner worked in, grab a three-sided nylon brush and start scrubbing! Gently yet firmly apply pressure to each side of the chain, using systematic sections as you go along. Think of this like brushing your teeth; every surface deserves some love. As you scrub, you will likely see dirt and grime lift away—this is a good thing! Remember not to overlook areas close to the sprockets; they often accumulate debris from road grit and should be attended to as well.
Once you finish scrubbing, it's time to wipe everything down effectively.
Take a microfiber cloth—these are great for trapping dirt—and gently wipe away the cleaner and grime from the chain surface. As you do this, rotate the wheel from behind to ensure you reach every part of the chain. It’s amazing how much muck can accumulate if left unattended. After wiping thoroughly, check for any missed spots before proceeding.
You might find yourself in a battle with stubborn grime at times—it's almost like it has a will of its own!
If your chosen cleaner suggests rinsing, gently spray water while being mindful not to soak the chain deeply or get water on sensitive components. It's key to allow everything to air dry completely before proceeding with lubrication later on. Rushing through this step could cause moisture buildup which could lead to rust over time.
Maintaining cleanliness is not only about aesthetics but also about performance and longevity.
Regular attention will make a world of difference, laying a solid foundation for what comes next.
Lubricating the Chain
Lubrication is paramount for optimal chain performance and longevity; therefore, it should not be overlooked. Think of lubrication as the lifeblood for your motorcycle chain. When done correctly, this process can greatly enhance both efficiency and durability. It's essential to adopt a few best practices to ensure that your chain remains well-lubricated and functions smoothly.
Best Practices for Lubrication
Optimal Timing is the first rule in the book. The best time to apply lubricant is right after you’ve finished riding. When the chain is warm, it opens up slightly, allowing the lubricant to penetrate effectively into the links. This step cannot be stressed enough; a warm chain absorbs lubricant far better than one at room temperature.
Once you've ensured that your bike has cooled down just enough for you to touch it safely, the next step involves how you apply the lubricant.
For Application, it's crucial to spray the lubricant onto the inner run of the chain while rotating the rear wheel slowly. This motion guarantees even coverage across all links. It’s like watering a garden; if you only sprinkle water on one spot, other plants will dry out. Be generous with your application but avoid over-lubrication because excess lubricant can attract dirt and debris as you ride, ultimately doing more harm than good.
Let it Sit
After spraying, allow the lubricant to sit for at least 15-20 minutes before taking your bike out for a spin. This waiting period lets the lubricant penetrate deeply into the links, ensuring that every part of your chain receives adequate protection against wear and tear. Just like letting an infusion steep allows flavors to fully develop, giving lubricant time to set enhances its effectiveness.
Regular maintenance doesn’t stop at lubrication; understanding how much benefit you gain from this practice is equally important.
In fact, regular lubrication can extend chain life by up to 30%, reducing not only the need for frequent replacements but also ensuring smoother rides overall. These are tangible benefits that make incorporating lubrication into your maintenance routine a no-brainer.
With these insights on maintaining your motorcycle's chain, it's now essential to focus on another vital aspect of upkeep: ensuring proper tension for optimal performance.
Adjusting Chain Tension
Proper chain tension is not just a technical specification; it’s crucial for both performance and safety. When the chain on your motorcycle is correctly tensioned, it ensures smooth power transfer from the engine to the rear wheel, enhancing your overall riding experience. Conversely, an improperly adjusted chain can lead to excessive wear, poor handling, or even chain failure—an alarming scenario for any rider. This makes regular adjustments necessary for both casual and serious riders alike.
To begin the adjustment process, first, you need to lift the rear wheel of the motorcycle. Using a paddock stand is recommended here; it not only elevates the bike safely but also provides stability while you work beneath it. Ensure that the bike is secure before proceeding, as a wobbly setup could lead to accidents. Once the rear wheel is off the ground, it's time to measure the slack in the chain.
Measuring chain slack is relatively straightforward. With your hand, push up and down on the middle of the bottom portion of the chain run. You'll want to watch for movement—ideally, your measurement should fall within an acceptable range: for street bikes, this typically falls between 25mm and 40mm, whereas off-road bikes may have a range closer to 40mm to 60mm due to their longer suspension travel. Getting these measurements right is essential; those long leaps on rugged terrain require a little extra play in those chains!
Once you’ve determined whether your chain falls into the happy zone of tension, it's time to loosen the axle nut slightly with a wrench. This step is crucial because it allows you to make adjustments without stress. Don’t go overboard here; a gentle loosening will suffice, as your goal here isn't to remove but merely adjust.
The next step involves adjusting the tension bolts, which is where things get interesting. Slowly move the rear wheel forward or backward using these bolts, making small adjustments on both sides. It's important not to rush this stage; patience is key since even slight changes can significantly influence tension. Always double-check each side after making any alterations to ensure they remain balanced—a misaligned adjustment can lead to uneven wear or functionality issues.
After you've dialed in your required tension settings, don't forget one last critical part: ensuring everything is secured properly.
Upon achieving your desired tension, firmly re-tighten the axle nut to lock in your adjustments. It's advisable to follow any specific torque specifications provided by your motorcycle’s manufacturer at this stage—over-tightening can yield its own array of problems just like under-tightening. An ideal tension keeps your riding smooth and safe while lowering risks associated with both loose and overly tight chains.
Maintaining correct chain tension is paramount in preserving your motorcycle's health and longevity. Through consistent checks and careful adjustments, you can enjoy an optimal riding experience and minimize unexpected repairs down the road.
As we continue on this journey toward maintaining your motorcycle’s performance, let's explore some valuable tips that will keep everything running smoothly.
Ongoing Maintenance Tips
Regular maintenance is key to getting the most out of your motorcycle chain. It extends the life of the chain, leading to smoother rides and a better overall experience on the road. A few extra moments spent checking your chain could save you from a costly breakdown later.
General Advice
Developing the habit of inspecting your chain weekly for signs of wear is crucial. Look closely for tight spots or kinked links; these are indicators of potential problems. Don’t just glance—take your time to ensure everything looks as it should. This simple act can prevent more significant issues down the road.
Aim to clean and lubricate your chain every 300-600 miles, or sooner if riding in wet or muddy conditions. Dirt and grime can create unnecessary resistance, leading to accelerated wear. A well-maintained chain enhances bike efficiency while reducing strain on the engine and transmission.
Checking chain tension is another critical aspect of ongoing maintenance. Ensure it's within the manufacturer’s recommended range—this prevents unnecessary stress on other components. Remember: A properly adjusted chain leads to smoother rides and less wear on vital parts.
Common Issues and Resolutions
Over time, chains may develop tight spots that signal impending failure if not addressed promptly. These tight areas can cause inconsistent power transfer and lead to premature wear on your sprockets as well. Regular checks help catch these issues early, often allowing for minor adjustments instead of a full replacement.
If you encounter a tight spot, take immediate action to adjust the tension or lubricate the chain to see if that alleviates the problem. If it doesn’t work, consider seeking professional assistance before going on long rides.
A well-maintained motorcycle chain not only boosts performance but also significantly enhances riding safety and comfort. Those extra minutes spent maintaining your motorcycle chains pay off tremendously; each ride feels more responsive, adding an extra layer of enjoyment to every journey.
Consider Alex's experience: “Keeping my chain clean and well-lubricated has made a big difference in my bike’s performance,” he shares with enthusiasm. “The effort is minimal compared to the benefits.” This perspective captures why ongoing maintenance shouldn't be neglected; it truly makes all the difference in your riding adventures.
In conclusion, consistently maintaining your motorcycle chain ensures optimal performance while enhancing safety and comfort during your rides. Invest time in this process for a smoother, more enjoyable experience on the road.
How often should I clean and lubricate my motorcycle chain?
Motorcycle chain maintenance frequency depends on your riding conditions. For typical street riding, clean and lubricate the chain every 300-600 miles. However, if you ride in dusty, muddy, or wet conditions, you may need to clean and lubricate it more frequently, such as every 200-300 miles. Regular maintenance prevents rust, reduces friction, and ensures a longer lifespan for the chain and sprockets. Check the chain regularly for dirt buildup, and adjust your maintenance routine based on your specific riding habits.
What tools and supplies are needed for cleaning a motorcycle chain?
You’ll need several basic tools and supplies for effective chain maintenance. These include:
• A chain brush or old toothbrush
• Chain cleaner or degreaser (designed specifically for motorcycle chains)
• A soft cloth or rags
• Motorcycle chain lubricant (compatible with your specific chain type)
• A rear paddock stand (to make cleaning easier, but optional)
Start by placing your motorcycle on a stable surface, ideally using a paddock stand. Apply the chain cleaner, scrub the chain thoroughly with a brush, and wipe it down with a cloth. Allow it to dry before applying a high-quality chain lubricant.
What are the signs that my motorcycle chain needs replacement?
A well-maintained chain can last thousands of miles, but it will eventually need replacement. Key signs to look for include:
• Excessive rust or corrosion
• Visible stretching or sagging of the chain
• Stiff or binding links that do not flex smoothly
• Unusual noises, like clunking or rattling while riding
If you notice any of these issues, it may be time to replace the chain. Continuing to ride with a worn-out chain can lead to decreased performance and potential safety hazards, so check it regularly and replace it as needed.
Check out the latest guides on motorcycling gear
Author: William Flaiz